Setting up ACH check drafting in Quikchek
1. Get ACH approval from
your bank, and have them provide you with ACH setup information.
2. Go into Quikchek Setup and fill out the ACH setup screen
3. Create a dummy checking account in Quikchek, and create a $10.00 balance
on that account.
4. Create an ACH batch of that persons account balance, this is your test file.
5. Send the test file to the bank.
6. If the bank rejects the test file you will make the necessary changes in the ACH setup screen then send another test file.
7. Once the file format is approved by the bank you are ready to create a billing batch.
Getting ACH approval
You must contact your bank, and advise them that you would like to use EFT check drafting to bill out membership dues. Advise them that you will have the ability to send the bank an "ACH file" also known as a "NACHA File" containing all the information necessary to draft your members' accounts on a monthly basis. They will have you fill out an application form, and with approval, they will send you the ACH setup information and requirements.
Quikchek Setup for ACH
|
Before entering the ACH setup information into Quikchek, please double click your My Computer icon. Double click your (C:) drive. Now click FILE >>NEW >> Folder. Name the folder "ACH files".
With the information packet you receive from the bank or with bank tech support on the phone, open Quikchek, login and go to Setup.
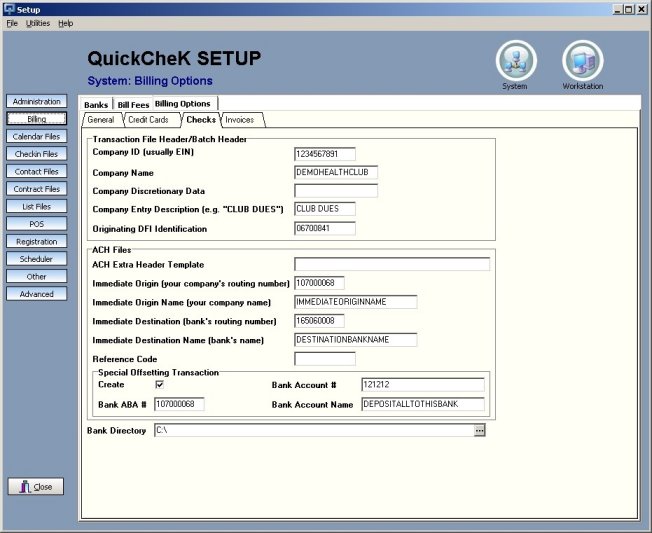
1. Open System, Billing, Billing Options.
2. Now select the Checks tab on the top right. Fill in all the fields on this screen.
3. The fields that are blank in the illustration to the right, can be left blank in your setup screen.
4. The ACH Extra Header Template field can also be left blank, unless your bank provides you with specific instructions to fill that in.
5. In the Bank Directory field at the bottom of the screen, click the three dots all the way to the right. You will see contents of your computer.
6. Double click the
C:\ drive to get to your root directory. Double click the ACH files folder you
created earlier. Click OK. Close SETUP.
Creating the Bogus Checking Account
1. Login to Quikchek, and select Member Management. Click the Members Module.
2. Find your Cash Customer or Quikchek Admin member.
3. Go to the Accounts tab, click ADD.
4. Select Checking as the Type, for Bank Name select First Bank of US.
5. Enter a bogus 8 digit Account Number in the Account Number field. Close this account by choosing OK.
Creating the Test Transaction
After saving the account, click the Account Transactions button in the top right. This will open the transaction screen. Click the Create New Transaction button in the bottom right. Enter TEST as your Description, enter 10.00 as your Amount. Choose OK.
You will now see the $10.00 transaction posted to the account. Close the account.
Creating your Test File
1. Go to the Billing tab.
2. Click the Account Balances tab.
3. Find your Cash Customer, or Quikchek Admin Checking Account in the list of accounts. Highlight the name, then right click your mouse on the name and choose Create Batch.
4. Click YES to the prompt.
5. Click OK, for the ACH effective date.
6. Go to the Send Data tab.
7. Select Checking. Highlight the file on the left that you just made. Click Move ACH Files. The file is now in your C:\ACH files folder.
Sending the file to the Bank
Your bank representative
will tell you how to transmit the file to the bank. It may be sent through email,
the Internet, windows hyper terminal, or a banking file transmission program.
If the bank tells you the file needs changes, just go into Quikchek Setup, and
make the necessary changes. Then follow the steps again to create a new test
file. Once they approve your file, you may do billing through Quikchek, sending
the file to the bank each month.