How to check-in a member
Open QuikCheK and Login, then select the Check-in module.
![]()
1. Enter the member number of the individual. Press the Enter button on the screen or keyboard. The member name and photo will now show on the right side of the screen.
2. Select an Activity on the Activities tab. (In this example, we have selected Tanning)
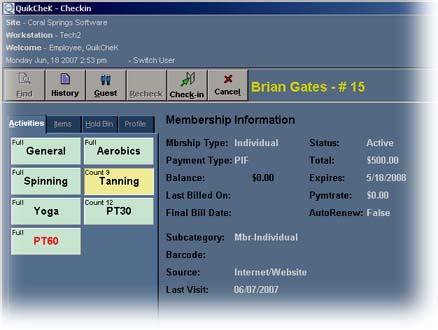
3. Click the Check-in button. The member has now been checked in.
NOTE: If you don't know the member number, you can use the Find button to bring up the Member search screen. The field that is highlighted in yellow at the top of the screen is the field you are searching by. In the search box, type in the first few letters of the members last name. QuikCheK will locate the member. Select OK. Then proceed as above by selecting the Activity then the Checkin button.
Recheck - use the recheck button to pull up the last member that was checked into the system.
Use AUTO-Checkin if you want the front desk to be unmanned. As members swipe in their key tag cards small pictures will build up in the HOLD bin. We recommend clicking the BATCH button every 30 minutes or so to keep the Hold bin from getting overpopulated.